

How to develop a registration form along with successful notification to email using Spring Boot and Thymeleaf.
Registration With Integrate Email API Spring Boot Application in STS
Hello everyone, in this article we will see, how we will start to develop a simple Registration with Email API in Spring Tool Suite environment(STS).
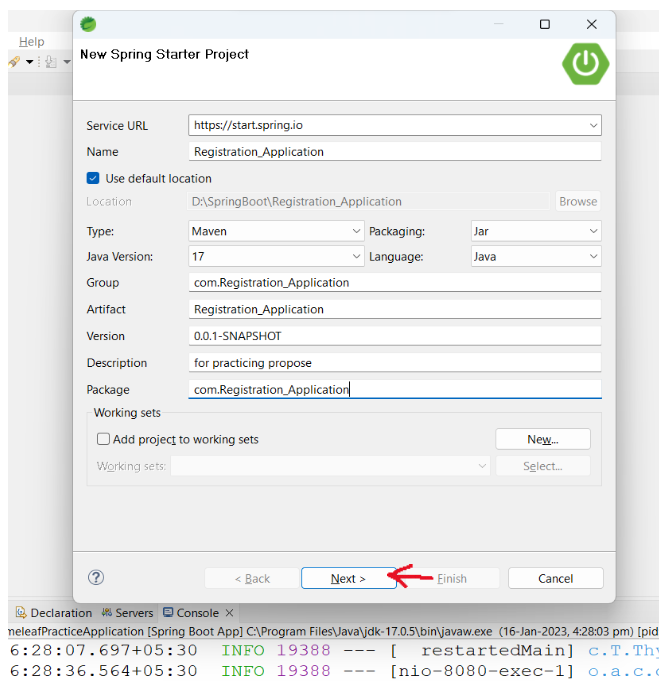
First open sts then we will create a new project.
File-> New -> Spring Starter Project

Then we will add the dependencies. Here I added MySQL Driver, Spring Web, Java Mail Sender, SpringBoot Dev Tools, Thymeleaf, Lombok, Spring Data JPA, Validation Adding dependency is very simple. Choose Dependencyes which is shown in the following figure. Then click on Next button.
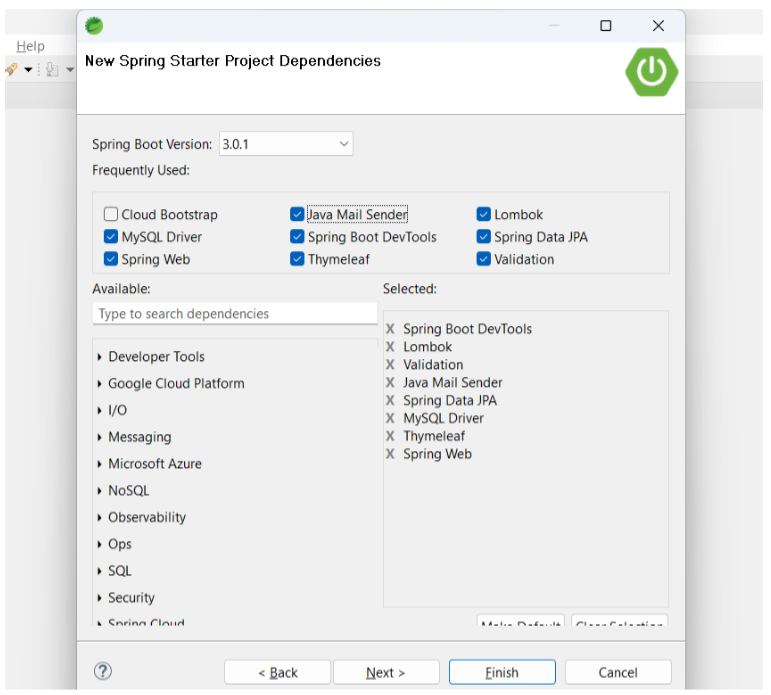
Then click on Next button and then click on Finish button.
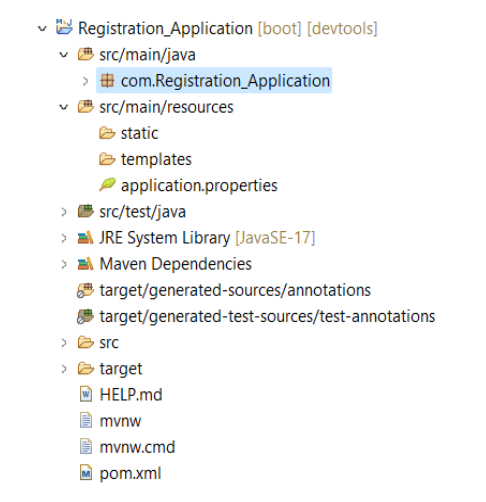
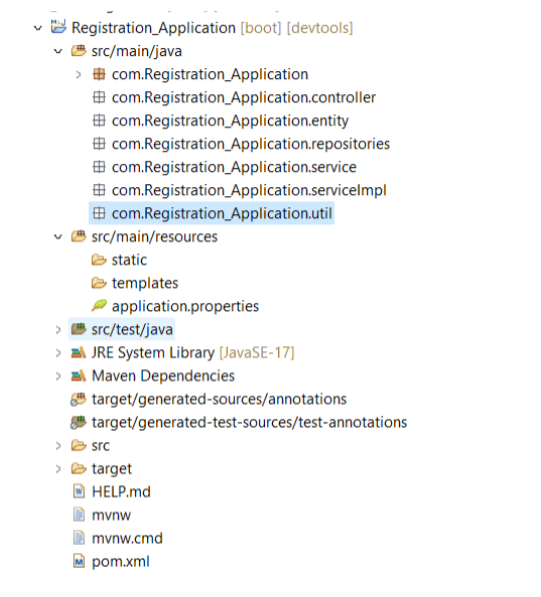
Now a project structure created named as Registration_Application.
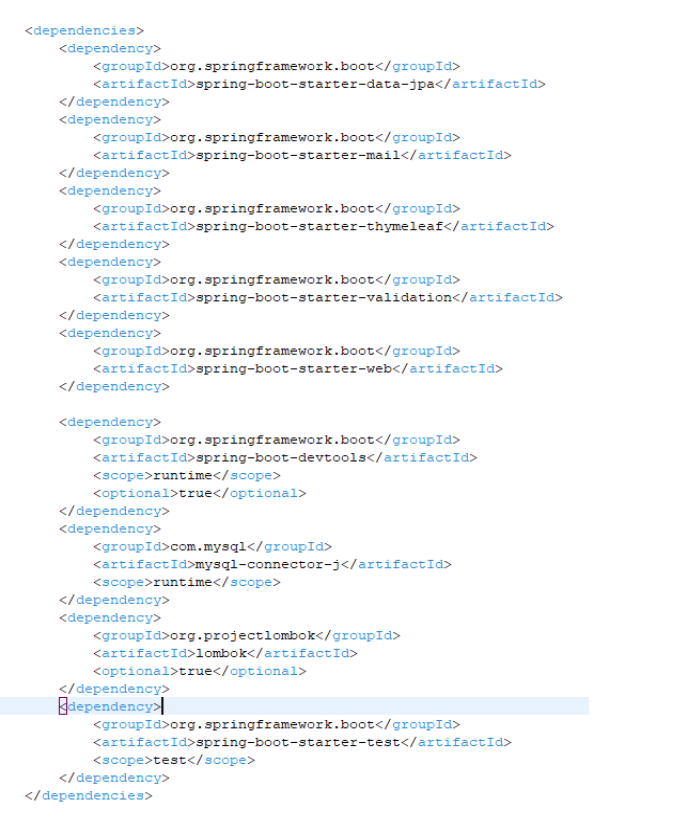
We need these Maven Dependency’s in pom.xml which is shown in the following figure.
pom.xml
We need packages to store the code package wise, for this I have created some packages
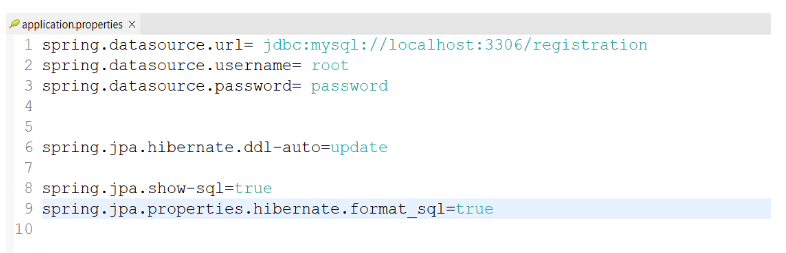
We need some configuration in application.properties file which is shown in the following figure.
Database table in MySQL workbench
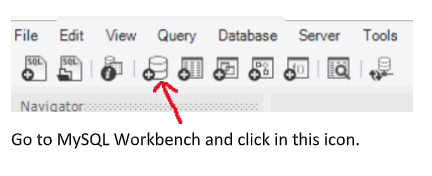
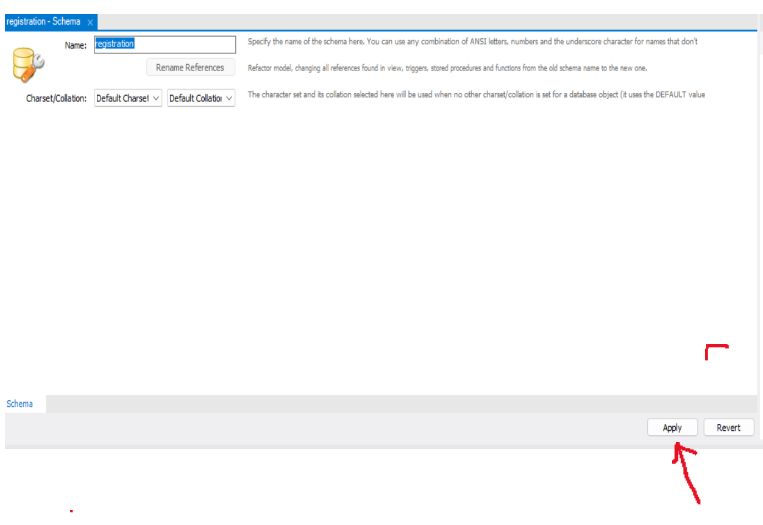
After clicking that icon I give database name what I give in application.properties file url.
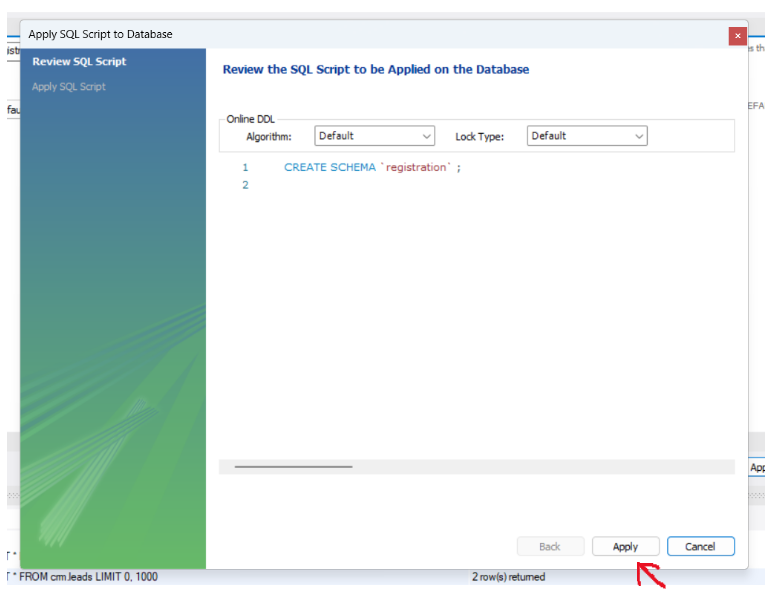
Then click on Apply button.
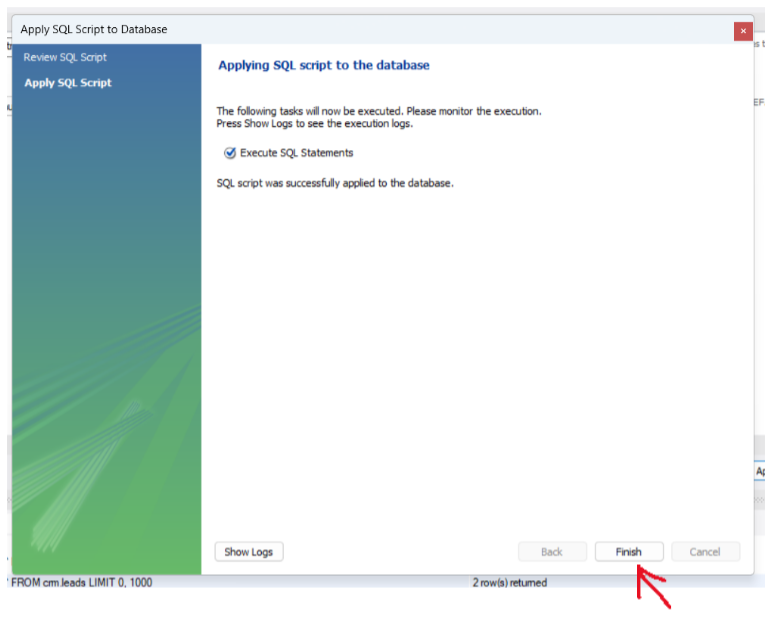
Then click on Apply botton.
Then click on Finish button.
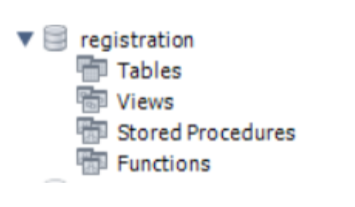
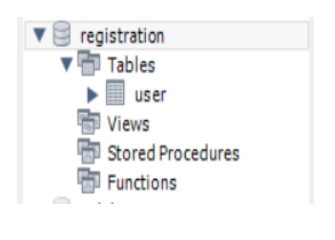
Then in my DATABASE -> SCHEMAS our database is created.
Now we need to create Entity class with some hibernate annotations and some Spring validator annotations
User.java
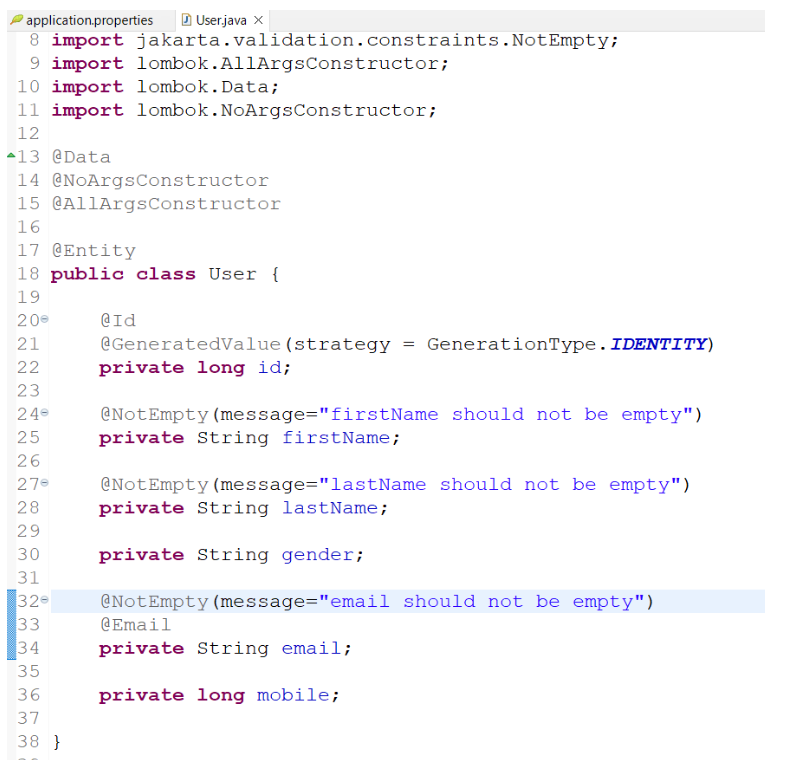
@Data Annotation :- The @Data annotation is equivalent to the combination of the following annotations:
- • @Getter
- • @Setter
- • @RequiredArgsConstructor
- • @ToString
- • @EqualsAndHashCode
The @Data annotation does the following work:
- • It generates the getter methods for all the fields.
- • It generates the setter methods for all the non-final fields.
- • It generates the toString() method implementation.
- • It generates appropriate equals() and hashCode() implementations, involving the fields of class.
- • It generates a constructor that initializes all the final fields, as well as all the non-final fields with no initializer that have been marked with @NonNull, in order to ensure that the field is never null.
@NoArgsConstructor :- The @NoArgsConstructor annotation is used to generate the no-argument constructor for a class.
@AllArgsConstructor :- The @AllArgsConstructor annotation generates a constructor with one parameter for every field in the class. Fields that are annotated with @NonNull result in null checks with the corresponding parameters in the constructor. The annotation won't generate a parameter for the static and initialized final fields.
@Entity :- The @Entity annotation specifies that the class is an entity and is mapped to a database table.
Hibernate Annotations
@Id :- The @Id annotation is inherited from javax.persistence.Id, indicating the member field below is the primary key of the current entity. Hence your Hibernate and spring framework as well as you can do some reflect works based on this annotation.
@GeneratedValue (strategy = GenerationType.IDENTITY) :- @GeneratedValue(stratergy=GenerationType. IDENTITY) is telling our DB to store primary key in the identity column which is a default column in SQL for default auto incremented primary key generation.
Spring Validator Annotations
@NotEmpty :- The annotated element must not be null nor empty.
@Email :- To say that a string field must be a valid email address.
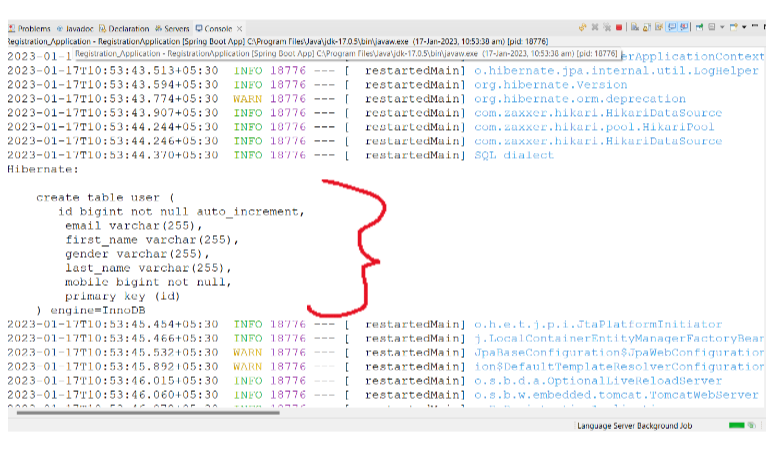
After creating entity class I restart our server , after restarting I saw in my console create database code’s are show in structure manner.
Because I have written these two line in my application.properties file :-
spring.jpa.show-sql=true
spring.jpa.properties.hibernate.format_sql=true
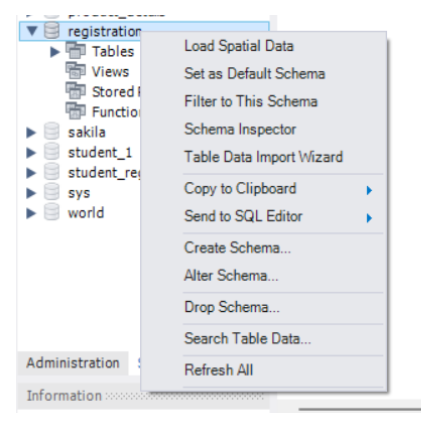
then go to our -> MySQL Workbench -> SCHEMAS -> registration database -> right click -> Refresh All
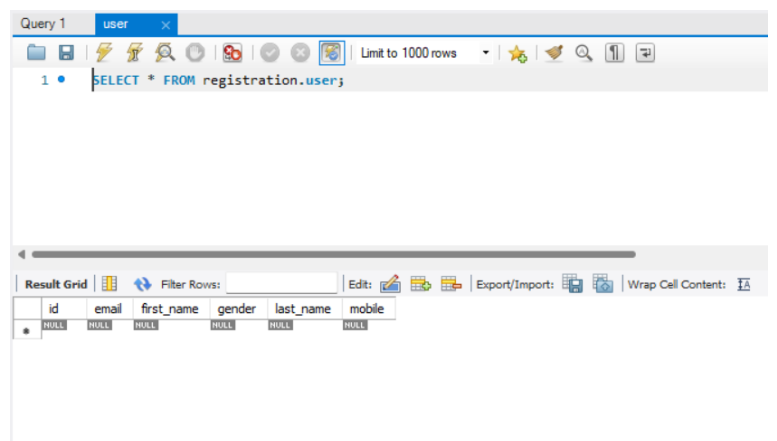
Then I saw my User table is created.
Then our User table look like which is shown in the following figure.
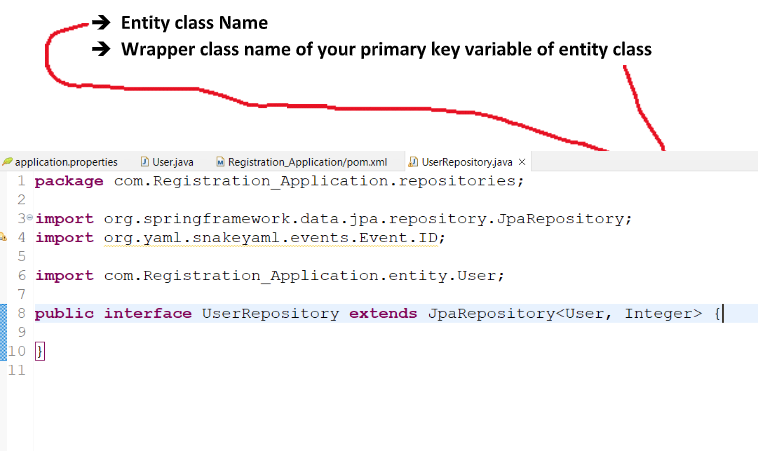
Then now I need to create UserRepository Interface which is extends with JpaRepository Interface
In Jpa Repository we need to give two things :-
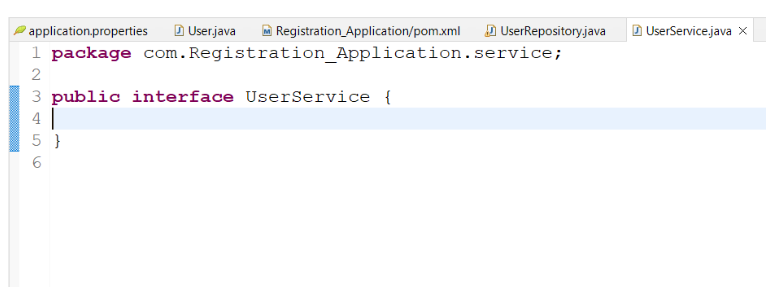
Now I create UserService Interface.
Then I create UserServiceImpl class and this class implements UserService Interface.
In UserService Interface I create incomplete method and in UserServiceImpl class I complete that incomplete method which I create in UserService interface.
@Service :- In an application, the business logic resides within the service layer so we use the @Service Annotation to indicate that a class belongs to that layer. It is also a specialization of @Component Annotation like the @Repository Annotation. One most important thing about the @Service Annotation is it can be applied only to classes. It is used to mark the class as a service provider. So overall @Service annotation is used with classes that provide some business functionalities.

Now we need to create Controller Class of my Spring boot project, In Controller layer we need to store all Handler methods.
@Controller :- The @Controller annotation indicates that a particular class serves the role of a controller. Spring Controller annotation is typically used in combination with annotated handler methods based on the @RequestMapping annotation. It can be applied to classes only. It's used to mark a class as a web request handler.
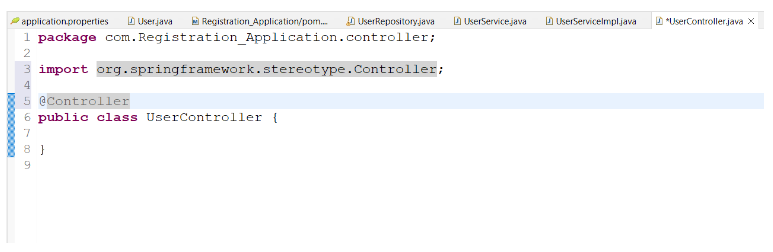
Update code in UserController.java
@Autowired :- @Autowired help us to perform Dependency injection.
Dependency injection :- When we write @Autowired Spring automatically create Object and inject an address into it.
@RequestMapping :- RequestMapping annotation is used to map web requests onto specific handler classes and/or handler methods. @RequestMapping can be applied to the controller class as well as methods.
Model :- it is used to transfer data between the view and controller of the Spring MVC application.
It should import from :- import org.springframework.ui.Model;
I create User Object because we need object address to store objects variables so that here I create User Object.
User user = new User();
Model.addAttribute help us to parse object reference Controller to frontend page.
model.addAttribute("user", user);
• return keyword help us to redirect frontend page.
Now we need to create thymeleaf page in -> scr/main/resources -> templates Which name is form.
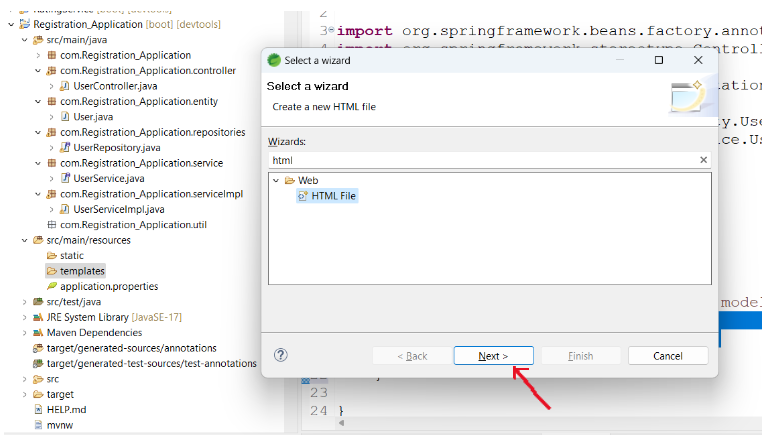
Then Click on Next button.
Then we need to give html file name as form.html .
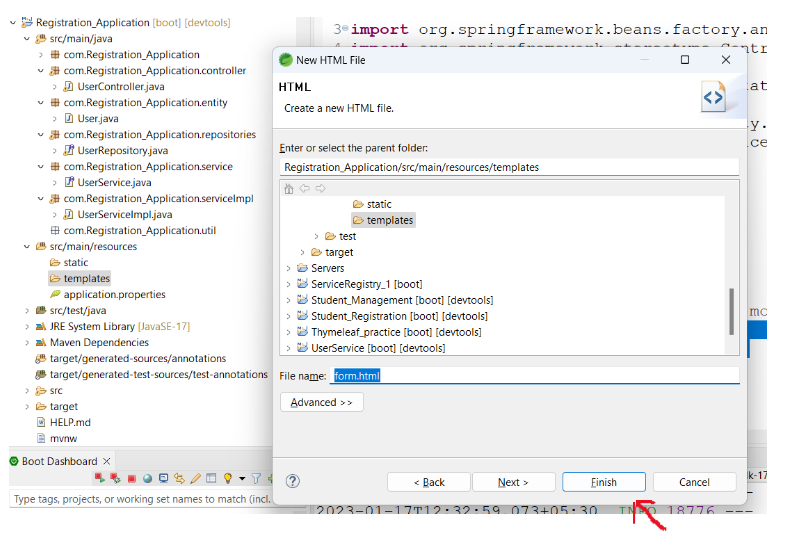
Then click on Finish button.
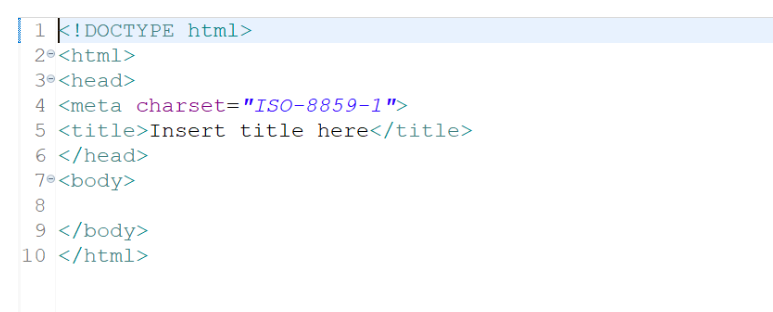
After creating html page look like which is shown in the following figure.
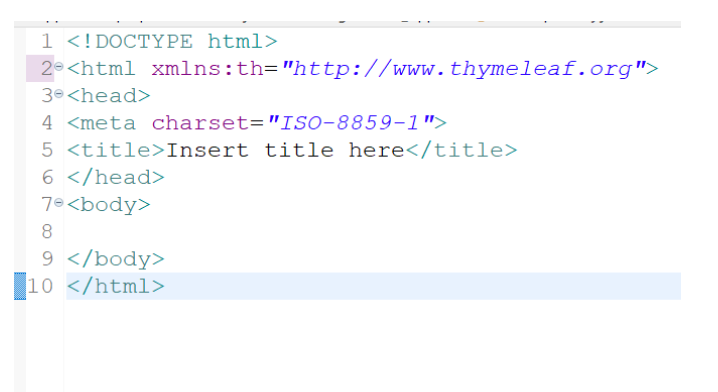
I need Thymeleaf page, so I need to convert html-5 page to Thymeleaf page.
So, I need one line of code which is convert html-5 page to Thymeleaf page.
write this line inside html tag which is shown in the following figure.
xmlns:th="http://www.thymeleaf.org"
Now, let us see the form.html file
- • The name of the object model is in th:field=”*{}” attribute.
- • In thymeleaf, the @ denotes the page context.
- • In order to access the model object, we have to use ${} notation in thymeleaf.
- • The th: object attribute is used to get the model object sent from the controller side.
form.html
<!DOCTYPE html>
<html xmlns:th="http://www.thymeleaf.org">
<head>
<meta charset="ISO-8859-1">
<title>Registration</title>
<link rel="stylesheet" href="https://cdn.jsdelivr.net/npm/bootstrap@4.4.1/dist/css/bootstrap.min.css" integrity="sha384-Vkoo8x4CGsO3+Hhxv8T/Q5PaXtkKtu6ug5TOeNV6gBiFeWPGFN9MuhOf23Q9Ifjh" crossorigin="anonymous">
</head>
<body>
<div class="container mt-5">
<h3 align="justify">Registration User</h3>
<div class="card" style="width: 55rem; ">
<div class="card-header text-center bg-info ">
<h3>Register</h3>
</div>
<div class="card-body">
<form th:action="@{/save}" method="post" th:object="${user}">
<div class="form-group">
<label ><b>First Name</b></label>
<input type="text" class="form-control" th:field="*{firstName}">
</div>
<p th:if="${#fields.hasErrors('firstName')}" class="text-danger" th:errors="*{firstName}"></p>
<div class="form-group">
<label ><b>Last Name</b></label>
<input type="text" class="form-control" th:field="*{lastName}">
</div>
<p th:if="${#fields.hasErrors('lastName')}" class="text-danger" th:errors="*{lastName}"></p>
<div class="form-group">
<label ><b>Email</b></label>
<input type="email" class="form-control" th:field="*{email}">
</div>
<p th:if="${#fields.hasErrors('email')}" class="text-danger" th:errors="*{email}"></p>
<div class="form-group">
<label ><b>Mobile Number</b></label>
<input type="tel" class="form-control" pattern="[9876][0-9]{9}" th:field="*{mobile}">
</div>
<div class="form-group">
<div class="form-group">
<b for="exampleFormControlSelect1">Gender</b>
<div class="form-check form-check-inline">
<input class="form-check-input" type="radio" name="inlineRadioOptions" id="inlineRadio1" value="Male" th:field="*{gender}" checked>
<label class="form-check-label" for="inlineRadio1">Male</label>
</div>
<div class="form-check form-check-inline">
<input class="form-check-input" type="radio" name="inlineRadioOptions" id="inlineRadio2" value="Female" th:field="*{gender}">
<label class="form-check-label" for="inlineRadio2">Female</label>
</div>
<div class="form-check form-check-inline">
<input class="form-check-input" type="radio" name="inlineRadioOptions" id="inlineRadio2" value="Other" th:field="*{gender}">
<label class="form-check-label" for="inlineRadio2">Other</label>
</div>
</div>
<div class="form-group">
</div>
</div>
<button type="submit" class="btn btn-primary">Submit</button>
</form>
</div>
</div>
</div>
</body>
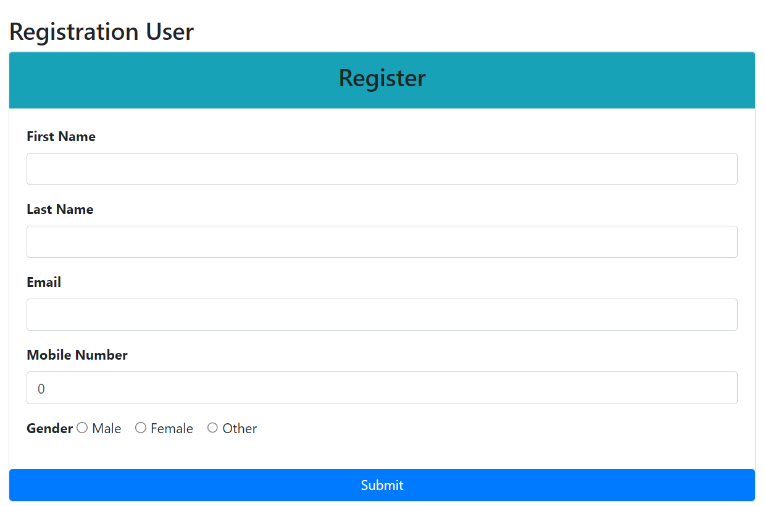
</html>Our frontend page is look like this which is shown in the following figure.
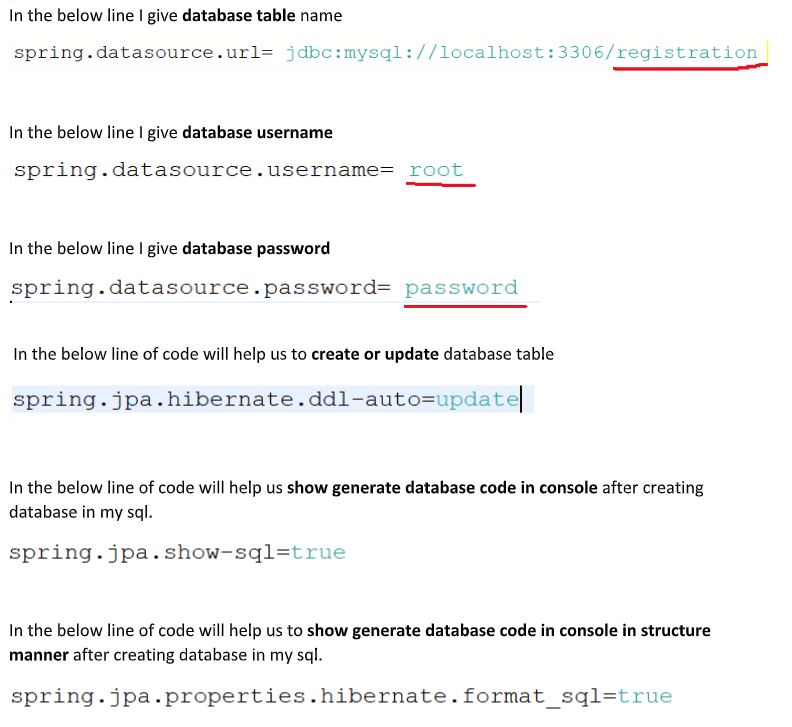
Then we need to devlop email api , so first I configure gmail smtp server in our application.properties file.
Update code in application.properties file
spring.datasource.url=
jdbc:mysql://localhost:3306/registration
spring.datasource.username= root
spring.datasource.password= password
spring.jpa.hibernate.ddl-auto=update
spring.jpa.show-sql=true
spring.jpa.properties.hibernate.format_sql=true

# code for email sending
spring.mail.host=smtp.gmail.com
spring.mail.port=587
spring.mail.username=<login user to smtp server>
spring.mail.password=<login password to smtp server>
spring.mail.properties.mail.smtp.auth=true
spring.mail.properties.mail.smtp.starttls.enable=true
Then I need to create EmailService interface in our util package.
Our Email consist of 3 fields which is to, subject, text.
Email Service.java
package com.Registration_Application.util;
public interface EmailService {
    public void sendSimpleMessage(String to, String subject,
    String text);
}
Then we need to complete that incomplete method in our EmailServiceImpl class.
Then we need to create one EmailServiceImpl class in our util package.
@Component :- @Component is a class-level annotation. It is used to denote a class as a Component. We can use @Component across the application to mark the beans as Spring's managed components. A component is responsible for some operations
EmailServiceImpl.java
package com.Registration_Application.util;
import org.springframework.beans.factory.annotation.Autowired;
import org.springframework.mail.SimpleMailMessage;
import org.springframework.mail.javamail.JavaMailSender;
import org.springframework.stereotype.Component;
@Component
public class EmailServiceImpl implements EmailService {
    @Autowired
    private JavaMailSender emailSender;
    public void sendSimpleMessage(
    String to, String subject, String text) {
        SimpleMailMessage message = new SimpleMailMessage();
        message.setTo(to);
        message.setSubject(subject);
        message.setText(text);
        emailSender.send(message);
    }
}
Now I need to devlop save handler method in controller layer which is take the data from frontend and saved into the database
@Valid :- The @Valid annotation ensures the validation of the whole object.
@ModelAttribure :- It binds form data to entity class object.
Binding Result result :- [ BindingResult ] is Spring's object that holds the result of the validation and binding and contains errors that may have occurred. The BindingResult must come right after the model object that is validated or else Spring will fail to validate the object and throw an exception.
-> If in frontend page any error occurs then it will help us to give proper error message and redirect to the same page.
if(result.hasErrors()) {

    model.addAttribute("user", user);
    return "form";

}
Update code in UserController.java
package com.Registration_Application.controller;
import org.springframework.beans.factory.annotation.Autowired;
import org.springframework.stereotype.Controller;
import org.springframework.ui.Model;
import org.springframework.validation.BindingResult;
import org.springframework.web.bind.annotation.ModelAttribute;
import org.springframework.web.bind.annotation.RequestMapping;
import com.Registration_Application.entity.User;
import com.Registration_Application.service.UserService;
import com.Registration_Application.util.EmailService;
import jakarta.validation.Valid;
@Controller
public class UserController {
@Autowired
private UserService userService;
@Autowired
private EmailService emailService;
// http://localhost:8080/registration
@RequestMapping("/registration")
public String registrationPage(Model model) {
User user = new User();
model.addAttribute("user", user);
return "form";
}
@RequestMapping("/save")
public String saveRegistration(@Valid
@ModelAttribute("user") User user, BindingResult result, Model
model) {
if(result.hasErrors()) {
model.addAttribute("user", user);
return "form";
}
String name = user.getFirstName().toUpperCase();
emailService.sendSimpleMessage(user.getEmail(),
"Welcome", name+" Your account has been successfully
registered.");
userService.register(user);
model.addAttribute("msg", name+" is registrated..");
return "form";
}
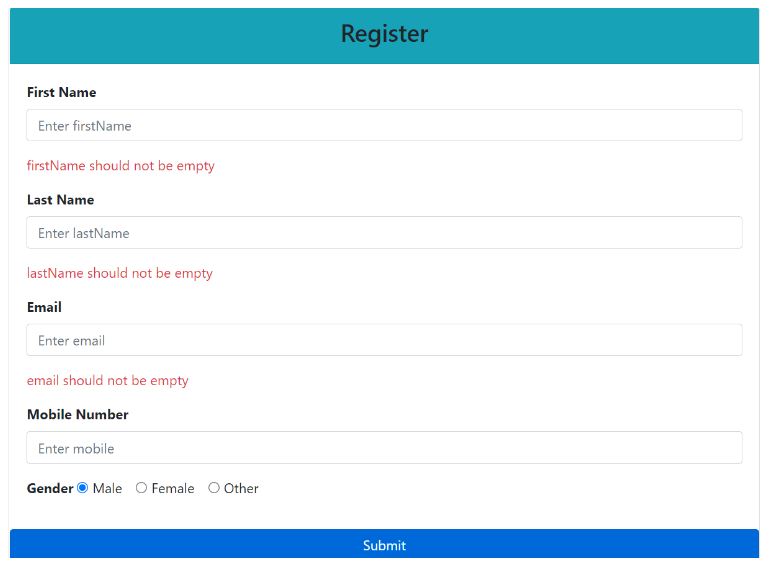
}If I am not filled form properly then it will give you error like this which is shown in the following figure.
Update code in form.html
<!DOCTYPE html>
<html xmlns:th="http://www.thymeleaf.org">
    <head>
        <meta charset="ISO-8859-1">
        <title>Registration</title>
        <link rel="stylesheet" href="https://cdn.jsdelivr.net/npm/bootstrap@4.4.1/dist/css/bo
        otstrap.min.css" integrity="sha384-Vkoo8x4CGsO3+Hhxv8T/Q5PaXtkKtu6ug5TOeNV6gBiFeWPGFN9MuhOf23Q9Ifjh" crossorigin="anonymous">
    </head>

    <body>
        <p th:text="${msg}"></p>
        <div class="container mt-5">
            <h3 align="justify">Registration User</h3>
            <div class="card" style="width: 55rem; ">
                <div class="card-header text-center bg-info ">
                    <h3>Register</h3>
                </div>
                <div class="card-body">
                    <form th:action="@{/save}" method="post" th:object="${user}">
                        <div class="form-group">
                            <label ><b>First Name</b></label>
                            <input type="text" class="form-control" th:field="*{firstName}" placeholder="Enter firstName">
                        </div>
                        <p th:if="${#fields.hasErrors('firstName')}" class="text-danger" th:errors="*{firstName}"></p>
                        <div class="form-group">
                            <label ><b>Last Name</b></label>
                            <input type="text" class="form-control" th:field="*{lastName}" placeholder="Enter lastName" >
                        </div>
                        <p th:if="${#fields.hasErrors('lastName')}" class="text-danger" th:errors="*{lastName}"></p>
                        <div class="form-group">
                            <label ><b>Email</b></label>
                            <input type="email" class="form-control" th:field="*{email}" placeholder="Enter email">
                        </div>
                        <p th:if="${#fields.hasErrors('email')}" class="text-danger" th:errors="*{email}"></p>
                        <div class="form-group">
                            <label ><b>Mobile Number</b></label>
                            <input type="tel" class="form-control" pattern="[9876][0-9]{9}" th:field="*{mobile}" placeholder="Enter mobile">
                        </div>
                        <div class="form-group">
                            <b for="exampleFormControlSelect1">Gender</b>
                            <div class="form-check form-check-inline">
                                <input class="form-check-input" type="radio" name="inlineRadioOptions" id="inlineRadio1" value="Male" th:field="*{gender}" checked>
                                <label class="form-check-label" for="inlineRadio1">Male</label>
                            </div>
                            <div class="form-check form-check-inline">
                                <input class="form-check-input" type="radio" name="inlineRadioOptions" id="inlineRadio2" value="Female" th:field="*{gender}">
                                <label class="form-check-label" for="inlineRadio2">Female</label>
                            </div>
                            <div class="form-check form-check-inline">
                                <input class="form-check-input" type="radio" name="inlineRadioOptions" id="inlineRadio2" value="Other" th:field="*{gender}">
                                <label class="form-check-label" for="inlineRadio2">Other</label>
                            </div>
                        </div>
                        <div class="form-group">
                        </div>
                    </div>
                    <button type="submit" class="btn btn-primary">Submit</button>
                </form>
            </div>
        </div>
        </div>
    </body>
</html>
About the Author

Silan Software is one of the India's leading provider of offline & online training for Java, Python, AI (Machine Learning, Deep Learning), Data Science, Software Development & many more emerging Technologies.
We provide Academic Training || Industrial Training || Corporate Training || Internship || Java || Python || AI using Python || Data Science etc


PreviousNext
Join our newsletter for the latest updates.
About us
Our Services
Contact Us
Our Courses
Learn Python | Learn AI | Learn Machine Learning | Learn Deep Learning | Learn Core Java | Learn Java JSP | Learn Java Servlet | Learn Java Spring Core | Learn Spring Boot | Learn Power BI | Learn DAA | Learn HTML | Learn SQL | Learn C Programming | Learn Bootstrap | Learn Git | Learn JavaScript | Learn Data Structure Using C | Learn RDBMS | Learn Data Science | Learn PHP
Our Tutorials
Python Tutorial | AI Tutorial | Machine Learning Tutorial | Deep Learning Tutorial | Core Java Tutorial | Java JSP Tutorial | Java Servlet Tutorial | Java Spring Tutorial | Spring Boot Tutorial | Power BI Tutorial | DAA Tutorial | HTML Tutorial | SQL Tutorial | C Programming Tutorial | Bootstrap Tutorial | Git Tutorial | JavaScript Tutorial | Data Structure Using C Tutorial | RDBMS Tutorial | Data Science Tutorial | PHP Tutorial
Copyright © 2023 Pythontpoint Powered by Silan Software Pvt. Ltd. All rights reserved.